Beginning SQL Server 2005 Programming
After a while (busy days…) I’ve got a new book: Beginning SQL Server 2005 Programming by Robert Vieira.
I’m not considering myslef a SQL Server expert but to be honest I was afraid of this beginning word in the title. Yet I’ve been using SQL Server for a couple of years (apart from Java, C#, etc. – so not full …
Security in accessing reports on Report Server
Once you deploy reports on to Report Server they can be accessed from any Web application with an established URL. However, I see a scenario when one wants to prevent some users from accessing reports (e.g. a user should be able to view reports presenting only their personal information).
The way around this is to view reports on an aspx …
Reporting Services – “Your browser does not support scripts or has been configured not to allow scripts.”
When I run a report in the Report Manager using Internet Explorer (I had this issue on IE7) I got the following error:
Your browser does not support scripts or has been configured not to allow scripts.
Solution
Should you get it as well follow the instruction below:
- go to (from its menu) Tools/Internet Options
- go to Security tab
- select
Reporting Services – blank Report Manager screen
I believe Reporting Services are very powerful tool for report generation. Unfortunately the installation process can be time consuming as you might face some problems with the cofiguration… Of course such problems can be the reason of unsufficient knowledge in SQL Server configuration and management, etc.
Anyway, blank Report Manager screen can be one of the problems, which displays as …
Create a report with Reporting Services
If you want to create a report in 5 mins, you should follow this tutorial.
All requirement software can be found there. I installed the following:
The tutorial instructs you how to create the report (RDL file): how to define the data source, layout and how to preview the report.
Once you’re done, you can use Report Manager to deploy …
Data Transformation Services
Recently, I’ve learned how to write DTS (Data Transformation Services) in SQL Server 2000. In general, this tool allows transformation of data: copying between different databases (by different vendors) and files (Excel, CSV, etc.). The idea is simple; the usage often priceless.
The execution path of a package is defined using a kind of graph, where nodes are tasks to …
TSQL – How to select multiple rows into a single row
I spend too long on finding the solution for this problem…
Basically I had a table which looked like this
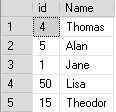
What I wanted was to select all as one row as a set of items separated with a comma, where an item was ‘id: name’. The items had to be sorted by the id. So the result was supposed to …
Reporting Services – problem with passing parameters directly in the URL
In one of the projects I had to create reports (using Reporting Services) that then should be accessible from the application I’ve been developing.
As the first thing I created the reports themselves (RDL files), deployed them using the Report Manager (more often http://localhost/Reports or http://localhost/Reports$SQLExpress), and configured so I could access them. However, each time I accessed a …
Reporting Services – deploying RDL files
In this post I’ll describe how to deploy RDL files using Report Manager (more often http://localhost/Reports or http://localhost/Reports$SQLExpress).
Note: This description applies to the situation where Microsoft SQL Server is used.
- Go to Report Manager
- Too keep all clean, you can create a folder in which you will keep all your reports
- Create the data source, if not yet